The emulator works with Firefox & Opera
Brief history of the Enigma machine
The Enigma machines were a series of electromechanical rotor ciphers based on a German engineer, Arthur Scherbius's invention [5]. Enigma machines were widely used by Nazi Germany during the World War 2. British scientist Alan Turing, leveraging on earlier breakthrough by three Polish military intelligence cryptanalysts Marian Rejewski, Jerzy Różycki and Henryk Zygalski, led the effort to break the cipher. Poor configuration and usage of the machine also facilitated the cryptanalysis. Breaking Enigma was a very important breakthrough that supported the Allied forces' war efforts, without which the outcome of the war and the world we live in today might have been quite different.
About this emulator
This enigma emulator has been developed by Leelar Thaophialuang as part of a set of demonstrators of basic cryptography techniques created in the School of Computer Science and Engineering at NTU Singapore under Anwitaman Datta's initiative, and captures the functionality and complexity of the Enigma machine. The emulator only simulates the three rotor Enigma M3 (Army; Navy). Reference materials for further reading can be found in the acknowledgement section. The last tab provides the actual emulator (works on Firefox & Opera).
ACKNOWLEDGEMENT
Acknowledgement
1. This emulator was designed and implemented by Leelar Thaophialuang as part of his final year project in the School of Computer Science and Engineering at NTU Singapore.
2. Brian Neal for providing py-enigma 0.1 Library. This project used py-enigma 0.1 to simulate the enigma emulator.
References
The accompanying information (and text/images) in this portal has been derived from the following sources:
[1] By Bob Lord - German Enigma Machine, uploaded in english wikipedia on 16. Feb. 2005 by en:User:Matt Crypto, CC BY-SA 3.0, https://commons.wikimedia.org/w/index.php?curid=258976
[2] B.Lucattelli.(2006).
Writing the Enigma Machine in ABAP: An Educational Project[online]. Available at: http://lucattelli.com/talks/enig-en/
[3] By Punishar - Own work, CC BY-SA 4.0, https://commons.wikimedia.org/w/index.php?curid=48423083
[4] CC BY-SA 3.0, https://commons.wikimedia.org/w/index.php?curid=88679
[5] https://en.wikipedia.org/wiki/Enigma_machine
[6] https://en.wikipedia.org/wiki/Cryptanalysis_of_the_Enigma
[7] CC BY-SA 3.0, https://commons.wikimedia.org/w/index.php?curid=23793
[8] Crypto Museum.(2009). Enigma Cipher Machine[online]. Available at: http://www.cryptomuseum.com/crypto/enigma/img/exploded.gif
[9] By en:User:Wapcaplet - uploaded in english wikipedia on 30. Jul. 2004 by author, CC BY-SA 3.0, https://commons.wikimedia.org/w/index.php?curid=258985
[10] By Created by
Wapcaplet
in Blender.
- Uploaded by Wapcaplet
to the English Wikipedia, CC BY-SA 3.0,
https://commons.wikimedia.org/w/index.php?curid=23791
[11] T.Long.(2009).
Enigma Simulator by Terry Long[online]. Available at: http://www.terrylong.org/images/screenshots/2.png(URL)
[12] T.Sale.
Technical Specification of the Enigma[online]. Available at: http://www.codesandciphers.org.uk/enigma/rotorspec.htm(URL)
[13] https://en.wikipedia.org/wiki/Enigma_rotor_details
ENIGMA MECHANICS
1. How the Enigma works
When a plaintext letter is pressed on the keyboard, the pressed key triggers an electric current which goes through the rotated components of the Enigma Machine. Once the current reaches the destination, a bulb that is coresponding to the ciphertext lights up.
Encipherment with Enigma is special in that the same plaintext letter will not yield the same ciphertext letter next time (polyalphabetic substitution). This is due to the fact that every time a letter is typed, the right most rotor is rotated one step so that when the same letter is pressed again,
it would not be enciphered as the same ciphertext letter. To add complexity to the enigma's encipherment, a plugboard was introduced to allow pairs of letters to be swapped before it actually goes through the movable elements of the Enigma. To make things even more complicated, different settings can be applied to every element of the Enigma machine
so that different settings would uniquely generate different overall encryption.
2. The working sequence of a single letter

- Suppose that the letter 'E' is pressed on the keyboard. Consequent to one keystroke, the right most rotor is being advanced by one step.
- The letter 'E' is entering into the plugboard. The plugbaord swaps the letter 'E' to letter 'W' given that the plugboard setting pairs 'EW' (in the Figure above).
- The letter 'W' is the letter produced by the plugboard and it is now passed to the static rotor. At the static rotor the letter is simply passed to another rotor.
- Every keystroke causes the right rotor to move down one position. As a consequence, the letter 'W' is not mapped to letter 'W'. Instead, it is mapped to letter 'X' since 'X' has moved to the position where 'W' was. The letter 'X' would then be linked to letter 'S' based on the internal wiring mapping determined by the ring setting. Following the same process, after going through the middle rotor and left rotor, the letter is now transformed to letter into 'D' as it is passed to the reflector.
Note: For the middle rotor and the left rotor in this example, we find that the letter 'G' at the middle rotor is mapped to the letter 'G' at the left most rotor because at the initail stage, none of the middle rotor or left rotor are moving yet.
- Different reflectors are wired up differently. In this example, the reflector B links the letter 'D' to letter 'H' and reflects the letter 'H' back to the three movable rotors.
- The letter 'H' now goes back and passes through the rotors, it is substituted, and mapped to one another reapeatly along the way and emerges as the letter 'L'.
- Again, The letter 'L' in the right rotor and the letter 'K' in the Static rotor have the same position. As a result, from the right rotor to the Static rotor, the letter 'L' is changed to the letter 'K' and it is directly passed back to Plugboard.
- The letter 'K' enters the plugboard. The plugbaord swaps the letter 'K' to letter 'A' since the plugboard settings pair 'AK'.
- The letter 'A' reaches the destination at Lampboard. The Lampboard lights up the letter 'A'.
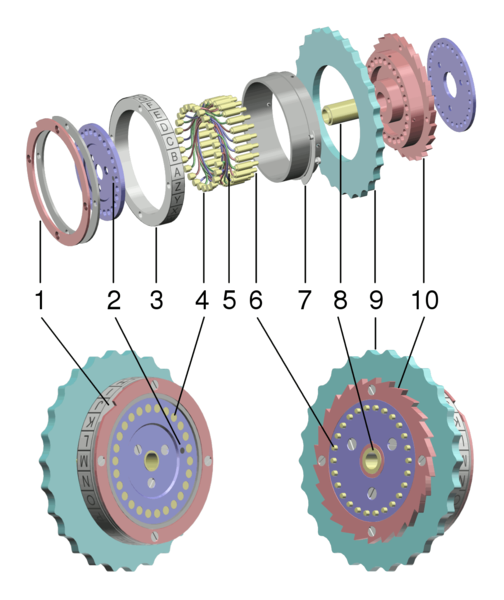
3. The components of the Enigma Machine
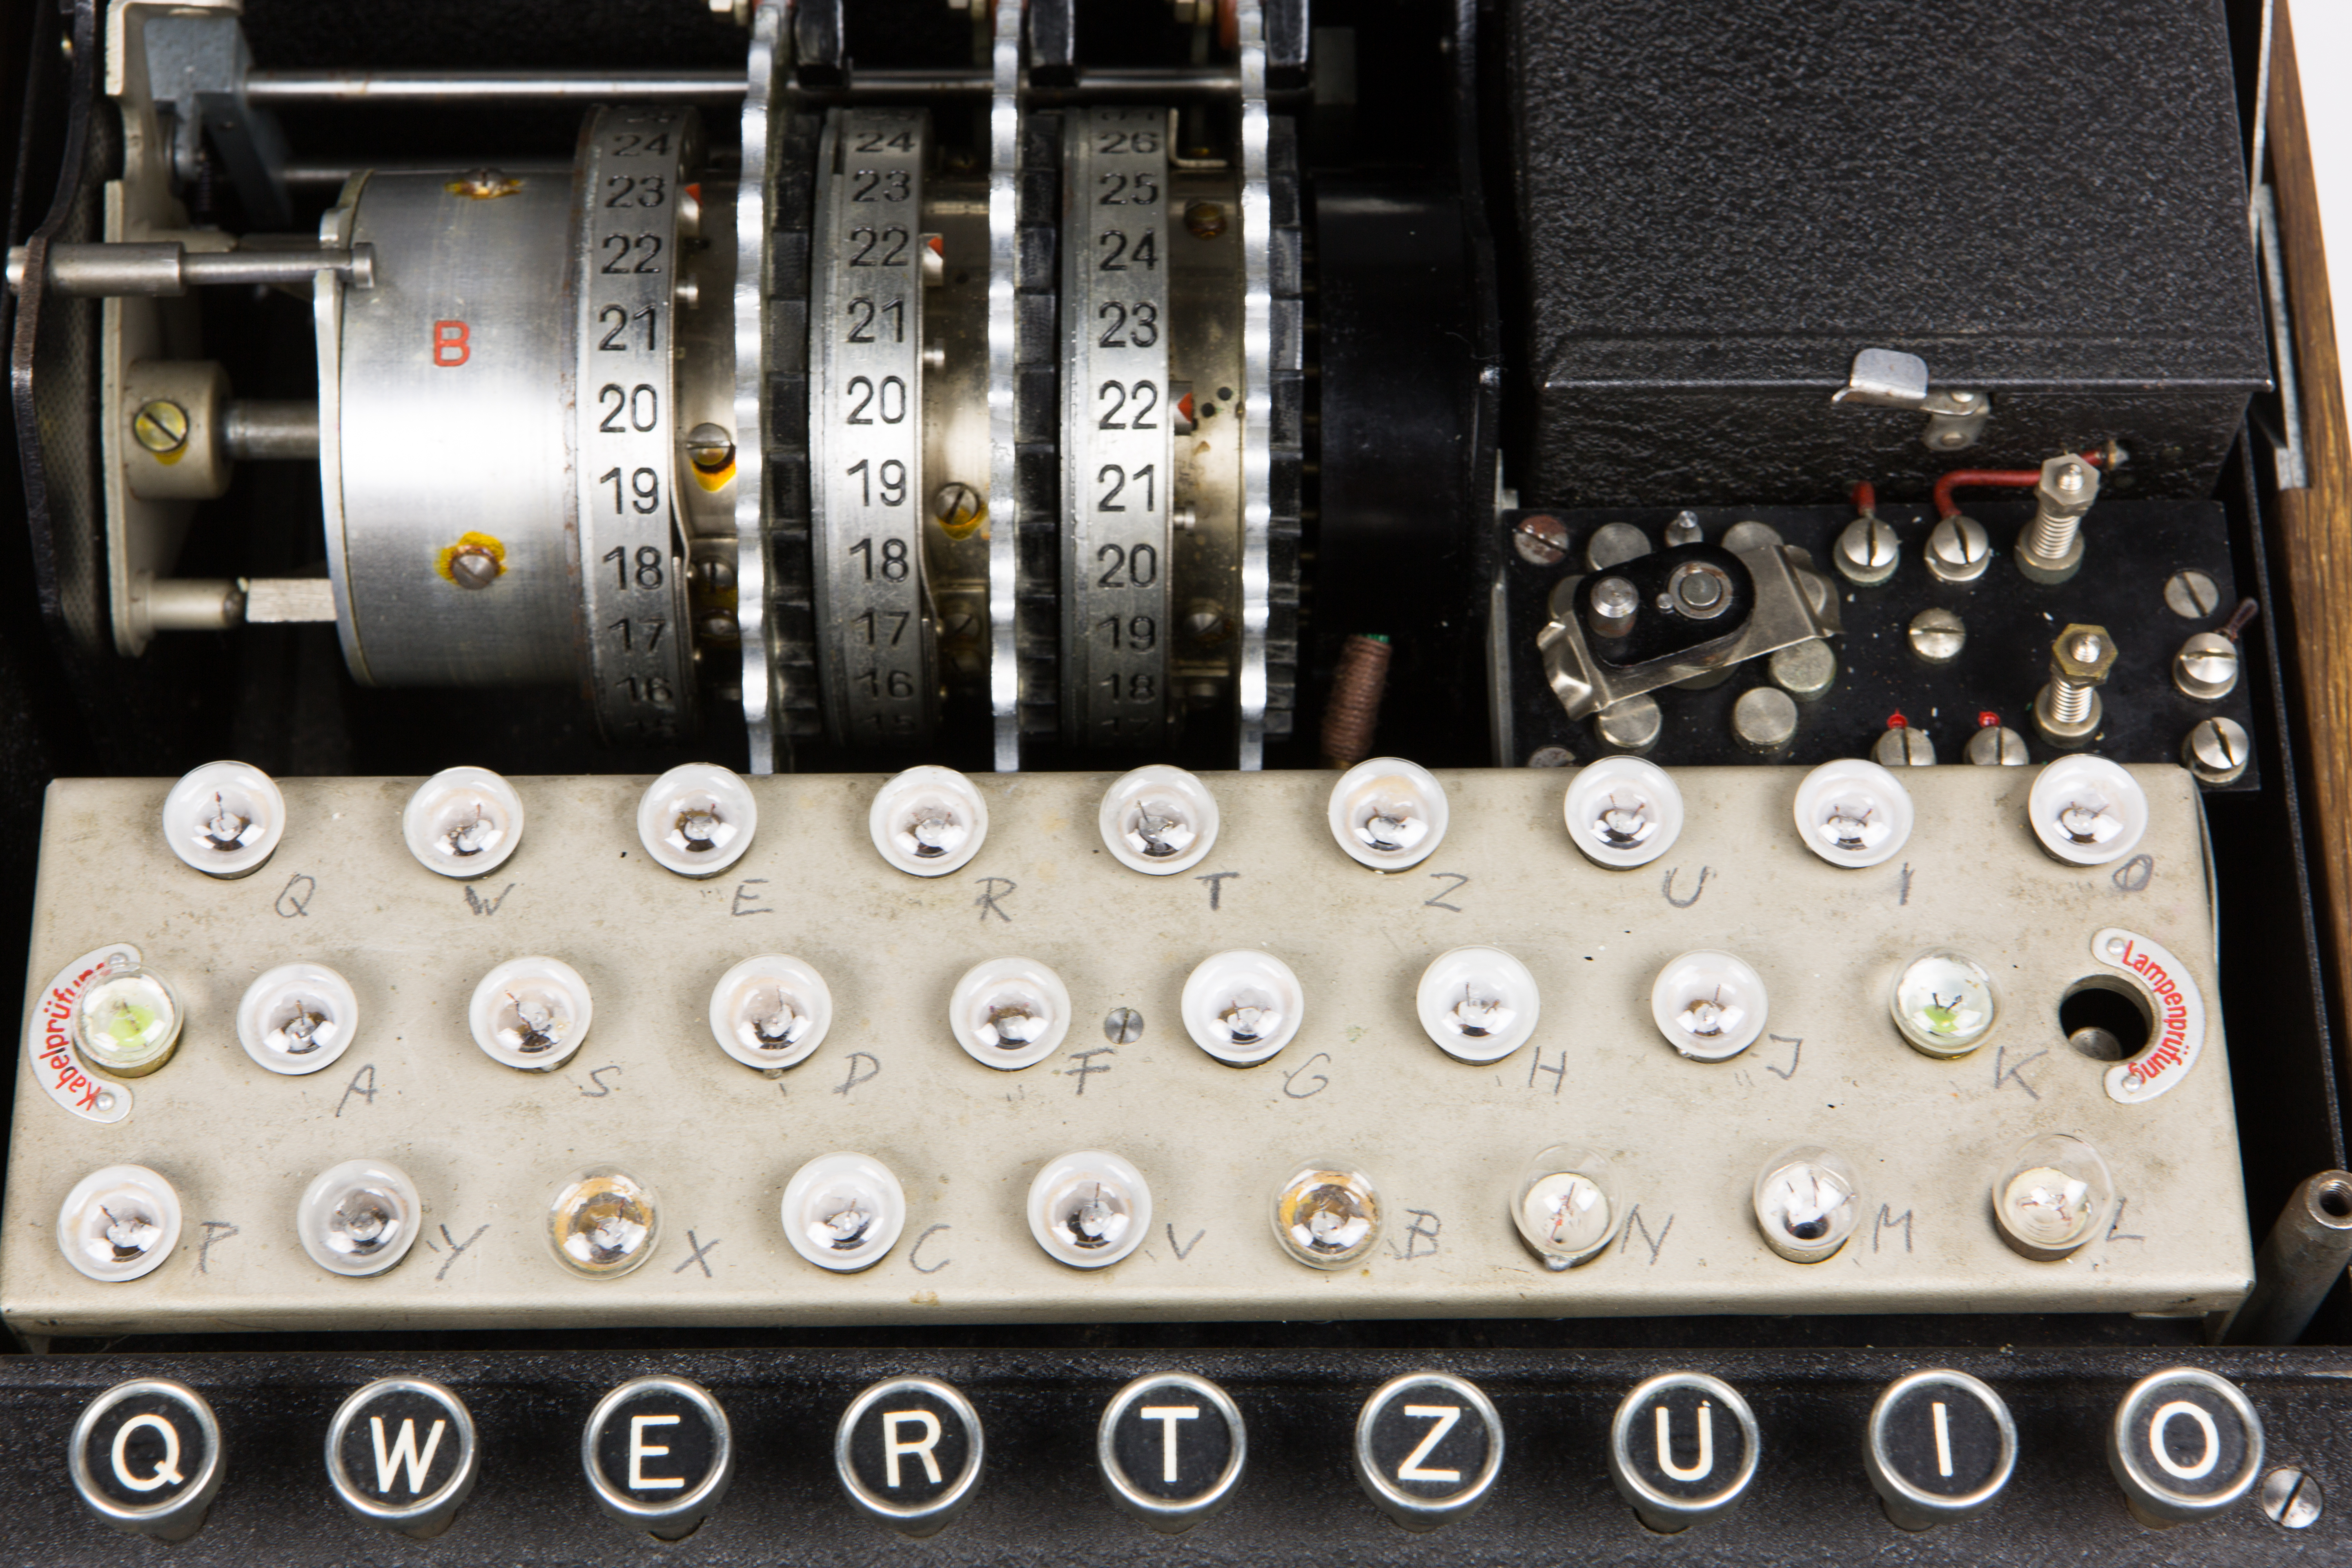
3.1 Keyboard
The keyboard is used to type the text to be encrypted or decrypted. The keyboard accepts the entered letter and relays the letter to the plugboard. It consists of 26 alphabets and it is an old QWERT layout, as shown in following figure. When any key on the keyboard is entered, an electric signal representing the key is sent to the plugboard.

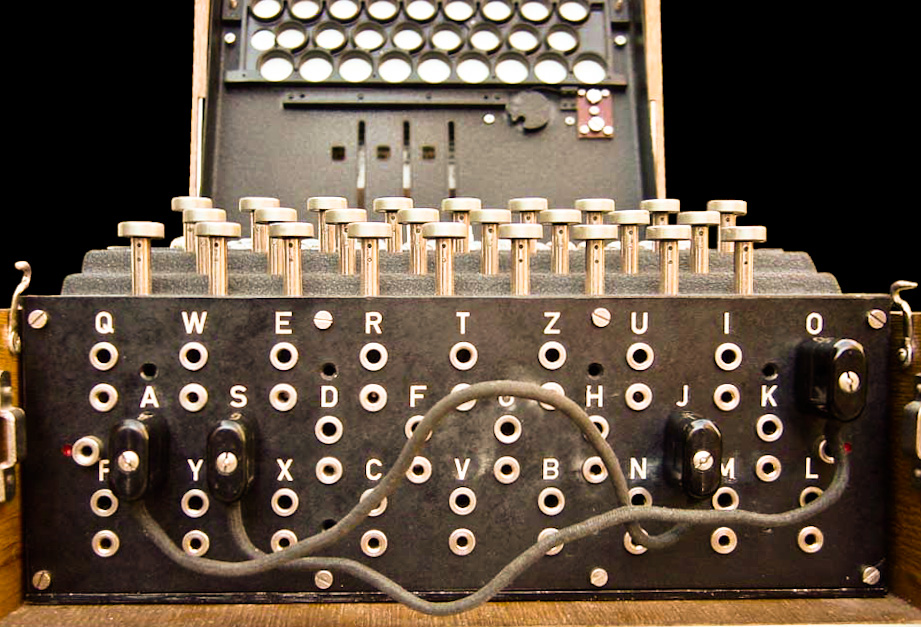
3.2 Plugbaord
Plugboard (Steckerbrett in German) allows incoming signal or outgoing signal to be swapped first before it goes through the rotors or goes out to the Lampboard. Introduction of the plugboard to the Enigma machine made it more robust. Normally, plugboard setting is manually created by plugging two wires together, and the number of pairs are limited to 10 pairs only. The plugboard has an additional constraint that no single letter can be mapped to two different letters. Any letter that has no pair is implicitly mapped to itself.
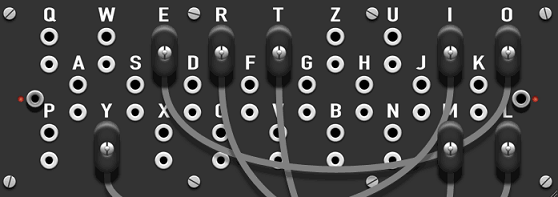
Image source: [11]
3.3 Static Rotor
A static rotor plays the role of a base reference. It has 26 letters with fixed positions. The static rotor seems to be doing nothing (in that it is static) but it has been chosen so that with every step of the right most rotor's rotation, the mapping of the letters between the right rotor and the stator varies significantly.
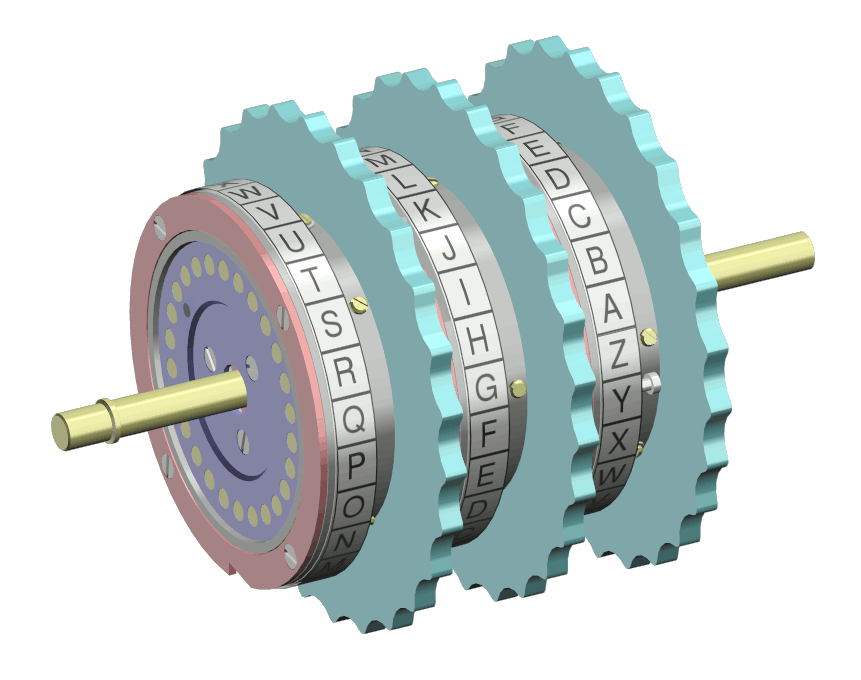
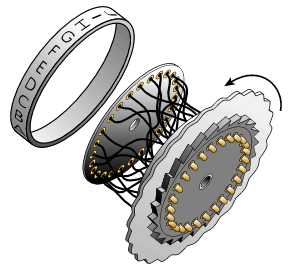
3.4 Movable Rotors
The rotors (alternatively wheels or drums, Walzen in German) are the main component of the Enigma machine. Every rotor has 26 contacts (letters) associated with 26 pins. The pins and contacts represent the 26 alphabets A-Z. A rotor individually can be seen to realize a monoalphabetic substitution cipher. For instance, in the Rotor 'I' (above Figure), the pin associated with the letter 'A' is wired to the letter 'E'. The complexity and security of the Enigma machine comes from the use of multiple rotors in a cascade, and their changing relative positions, which realize a polyalphabetic substitution. Each rotor has its own notch, used to indicate the step the rotor is in at a given time point.
3.4.1 Technical specifications of the Enigma rotors:
Following table shows the internal-wiring/mapping of different rotors at default setting or when ring settings are set to zero.
| INPUT |
A |
B |
C |
D |
E |
F |
G |
H |
I |
J |
K |
L |
M |
N |
O |
P
| Q |
R |
S |
T |
U |
V |
W |
X |
Y |
Z |
| ROTOR I |
E |
K |
M |
F |
L |
G |
D |
Q |
V |
Z |
N |
T |
O |
W |
Y |
H |
X |
U |
S |
P |
A |
I |
B |
R |
C |
J |
| ROTOR II |
A |
J |
D |
K |
S |
I |
R |
U |
X |
B |
L |
H |
W |
T |
M |
C |
Q |
G |
Z |
N |
P |
Y |
F |
V |
O |
E |
| ROTOR III |
B |
D |
F |
H |
J |
L |
C |
P |
R |
T |
X |
V |
Z |
N |
Y |
E |
I |
W |
G |
A |
K |
M |
U |
S |
Q |
O |
| ROTOR IV |
E |
S |
O |
V |
P |
Z |
J |
A |
Y |
Q |
U |
I |
R |
H |
X |
L |
N |
F |
T |
G |
K |
D |
C |
M |
W |
B |
| ROTOR V |
V |
Z |
B |
R |
G |
I |
T |
Y |
U |
P |
S |
D |
N |
H |
L |
X |
A |
W |
M |
J |
Q |
O |
F |
E |
C |
K |
| ROTOR VI |
J |
P |
G |
V |
O |
U |
M |
F |
Y |
Q |
B |
E |
N |
H |
Z |
R |
D |
K |
A |
S |
X |
L |
I |
C |
T |
W |
| ROTOR VII |
N |
Z |
J |
H |
G |
R |
C |
X |
M |
Y |
S |
W |
B |
O |
U |
F |
A |
I |
V |
L |
P |
E |
K |
Q |
D |
T |
| ROTOR VIII |
F |
K |
Q |
H |
T |
L |
X |
O |
C |
B |
J |
S |
P |
D |
Z |
R |
A |
M |
E |
W |
N |
I |
U |
Y |
G |
V |
Source: [12]
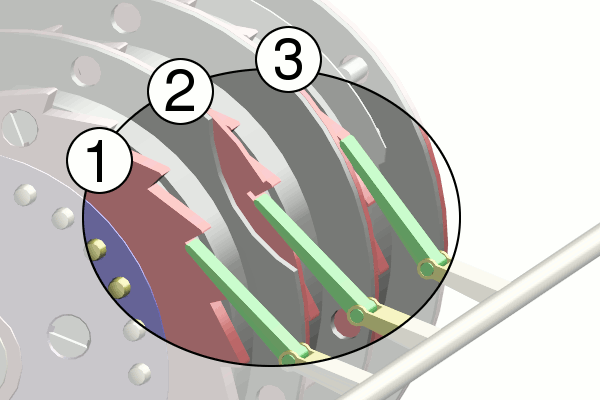
3.4.2 Turnover notch positions
Each rotor has one or two notches. Notch refers to the stepping mechanism. For single stepping, a rotor has only one notch and when the rotor has fully finished one round, it will trigger another rotor to move forward one step. This happens when a pal on the rotor meets the notch. For double stepping, rotor has two notches for triggering another rotor's step. It is not necessary that a rotor to fully finish one round for a next rotor to rotate, since, having two notches, the rotor can meet a notch earlier.
Note:Following table corresponds the Enigma machine M3 (Army; navy) only.
| Rotor Name |
Notch |
| Rotor I |
Q |
| Rotor II |
E |
| Rotor III |
V |
| Rotor IV |
J |
| Rotor V |
Z |
| Rotor VI,VII,VIII |
Z and M |
Source: [13]
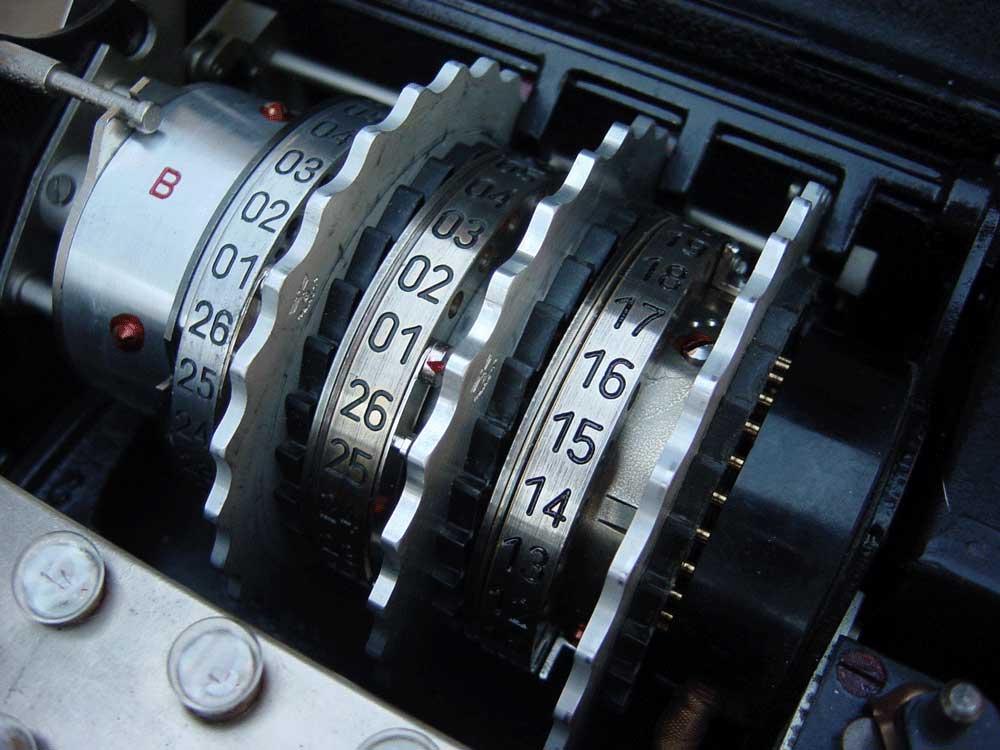
3.5 Reflector
Reflector (German: Umkehrwalze) is single-sided. The reflector takes the last input from the left rotor and performs a very simple substitution where its contacts are swapped in pairs. Two possible reflectors are available for the Enigma machine, each of them is wired up with different combination of wirings so that every single letter is reflected differently.
3.5.1 Technical specifications of the Enigma reflectors
| Reflector Model |
Pair of wirings |
| B |
(BR) (CU) (DH) (EQ) (FS) (GL) (IP) (JX) (KN) (MO) (TZ) (VW) |
| C |
(AF) (BV) (CP) (DJ) (EI) (GO) (HY) (KR) (LZ) (MX) (NW) (TQ) (SU) |
Source: [12]
3.6 Lampboard
The lampboard follows the same layout as the keyboard. Each letter has its coresponding bulb, which lights up to represent the enciphered or deciphered letter obtained from the encryption and decryption respectively.

4. Encryption & Decryption
Enigma is a symmetric encryption system, so it is assumed that some secrets have already been agreed and exchanged a priori. These secrets are key, ring's order, ring setting, reflector setting, plugboard, and initial display windows.
EMULATOR HELP
1. Plugboard Setting
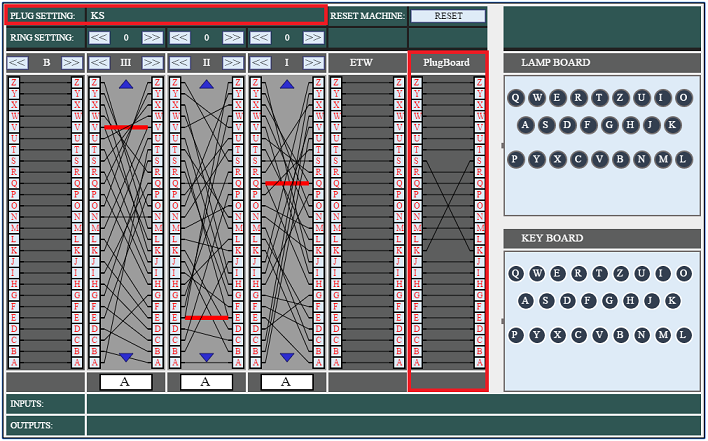
Plugboard setting is indicated with a red rectangle in the figure below. To set the plugboard, first choose a pair of alphabets. Then click the first alphabet on the right side of the plugboard followed by clicking the second alphabet on the left side of the plugboard. When a character is clicked, the clicked pin will change its background to yellow signaling that the clicked pin is selected. This forms a pair of plugboard setting.
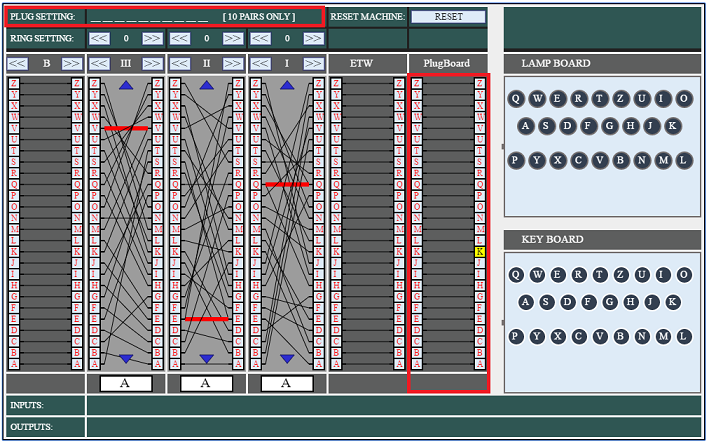
Following figure shows the above instructions. Since plugboard setting has a constraint that no single alphabet can be mapped to two different alphbets, in this example we are trying to swap 'K' with 'S'. We find that there are two wires, one is mapping the letter 'K' to the letter 'S' while another one is mapping the letter 'S' to 'K'. The number of pairs are limited to 10 pairs only.
2. Ring Order Setting (Walzenlage)
The red rectangle shows the Walzenlage or Ring's order. There are three rotors from left to right: left rotor (outer), middle rotor, and right (inner) rotor. From left to right we can arrange the order of the rotor in any order by clicking the right-arrow button or left-arrow button. This emulator supports 8 differents rotors, namely 'I', 'II', 'III', 'IV', 'V', 'VI', 'VII', and 'VIII'. To set the ring's order, three rotors are chosen from these 8 rotors based on ones preference. Duplicating the rotor type is discouraged, example: "II II II", "II I II","II II I", and other duplicated orders.

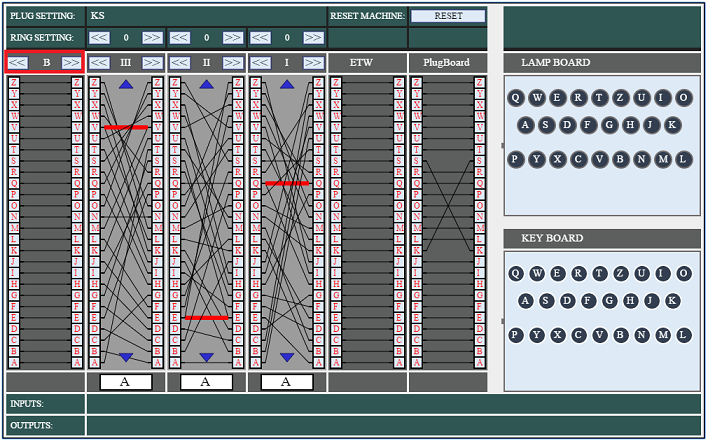
3. Reflector Setting (Umkehrwalze)
Reflector Setting is highlighted by the red rectangle. In emulator implements two types of reflectors - reflector 'B' and reflector 'C'. To change the setting, click on the right-arrow button or left-arrow button. Different reflectors are wired differently.
4. Entry Wheel (Eintrittzwalze)
The wiring of the Eintrittzwalze (ETW, entry wheel) between the Plugboard and the Rotors cannot be manipulated.
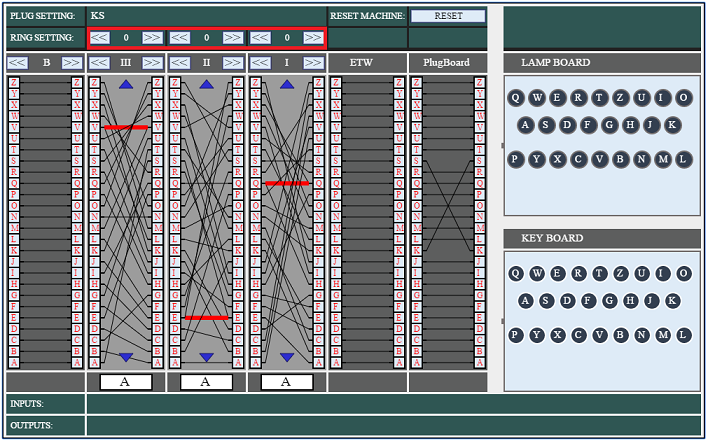
5. Ring Setting (Ringstellung)
Ring Setting is the area of red rectangle. Changing the ring setting makes changes to the internal-wiring mapping. Each rotor has 26 possible ways of setting and setting ranges from 0-25. Changing the setting can be done by clicking left-arrow button or right-arrow button.
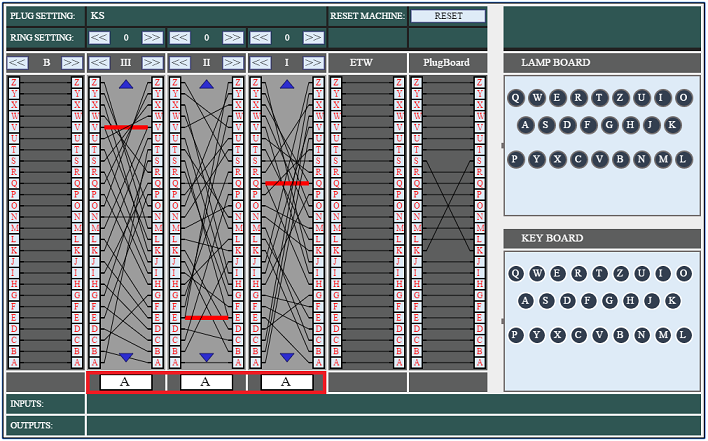
6. Display windows (Grundstellung)
The display windows are shown in the red rectangle. Display windows are current positions of the three rotor which can be seen by the officer or user. Scrolling up and down the rotor will change the windows value (current positions). Display windows has to be firstly set before encryption/decryption. Display windows are secret from intruders and attackers. Every time a letter is typed, diplay winodow of the right most rotor is increased by one offset, followed by a conditional stepping if any of the midlle rotor or left most rotor meeting corresponding notches.
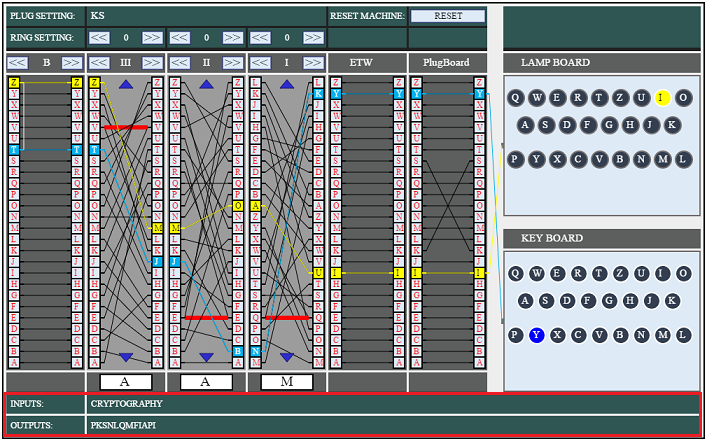
7. Inputs and Outputs
Inputs and Outputs is the area indicated with a red rectangle, located at the bottom of the Enigma emulator. This is an artefact of the emulator itself, where the input and corresponding output is printed to explicitly keep track of what has been typed as well as what has been the resulting enciphered text.
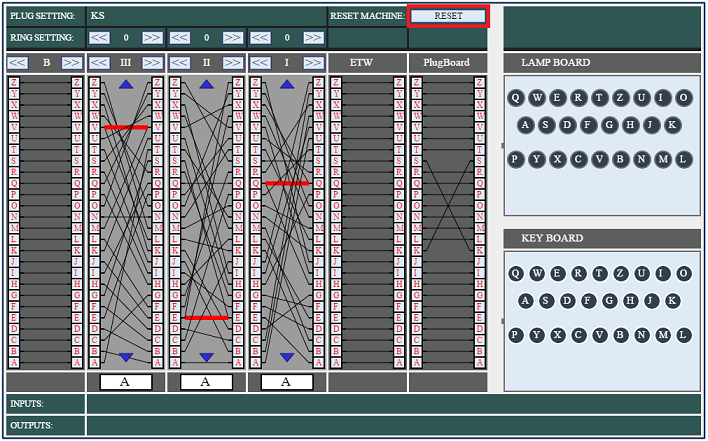
8. Reset Enigma
Reset Button is highlighted by the red rectangle. User can reset the enigma emulator to its default settings by clicking this button.